Sunday, June 30, 2013

Deco-whaaat?

  Have you ever heard of Decoden?  Me neither but apparently I have seen it before.  You have too probably.  It's of the Japanese-Kawaii style of decadence often of the very soft, girly, sparkly over abundance sort of way.  I have recently done a little bit of internet stalking of Decoden tutorials and styles.  Of course I am under exaggerating.  I was up until 3:30AM the other night searching clay art, gluing techniques, and of course what others have done in the world of Decoden.  It's gaudy and absolutely fascinating.  Look it up yourself and you will see what I mean.  At this point I have far too many ideas in my head to even begin at this point.  I suppose I am afraid of having an over abundance of cell phone and iPod cases I don't really need.  Though I have decided to make them anyway because you only get good with practice and I am really starting to like this tacky stuff.  I spent so many years trying to be sleek, elegant, and nerdy, I plan to change all of that in one fail Decoden swoop. 
  Luckily I already have a bit of polymer clay and beads but there are some things that are still needed and techniques I still need to learn.  But, I have come up with some really cool ideas that are a little more geek themed than all the hello kitty/desert themed.  (although I really want a food themed one Te-He!)

Here is an image, just a taste of what you would find online with more prodding into the world of Decoden.

Here are some websites and videos/tutorials I have found helpful in my search for information.  Since I will never be able to scratch the surface that fills this world I will let some of these websites do it for me.


Any comments about Decoden leave them below.

Thanks for reading and keep up the crafts kiddos.


Wednesday, June 26, 2013

Wipe Out Nails

How-to Remove Nail Polish Quickly
I have had so much trouble with removing nail polish that I bought the strong stuff with Acetone just to get it off.  Five cotton balls later I would have removed the nail polish off of my nails and my nail beds with be sore from the scrubbing.  One day, trolling Pinterest for nail design ideas I found a strange picture of a thumb with a piece of fluffy cotton on top.  I read the caption and found the following trick to remove nail polish with little to no pain or hassle. 
Below is my interpreted tutorial on the technique. 

PS. The small print states that by adding foil to the outside of the nail it will help remove acrylic nails and glitter polish.


Please keep reading and keep on crafting kiddies.

Please comment below.
 
Pin It

Sunday, June 23, 2013

App-daptable

(Beware! I become a little long winded here.)
A friend at work (thanks Ashley M.) has shown  me how cohesive her iPhone has become now that she has customized her apps.  She downloaded an app called App Icons and was able to customize the images for her apps with her own photos or with many of the options the icon app gave her free.  There were even many pre-created categories for her if she just wanted a complete look without the work.  I downloaded the free version later that night if you are willing to pay for the upgrade you get many more choices than the free version I downloaded.  For me, I was happy enough with the fee free version and realized it may not change the look of my iPad as much as I might like just because I keep all my apps hidden in combined category buttons. If you noticed by the image above I have to open my social media button before I see my actual apps.  I prefer less clutter on my screen. I am more of a wallpaper person.  But, given all that negative chatter I just spewed I was still very pleased to update some of my favorite apps with a few self designed ones. 
 
As you can see in the above image I was able to put in my own URL to create an "app", as it were, to my own website.  Very cool!  I also drew on my Brushes app the Pinterest logo so it would go with my color theme and with Twitter/Skype I used similarly colored photo from my own albums to create those app bases.  The frames were one of the choices in the app and the logos. If you've been wondering how to do it download the free App Icon app yourself any play around with some of the looks your phone can now have.
 
Have fun customizing your own device and keep on crafting kiddies.
 
Any comments or questions please leave them below, and don't forget to follow my blog to keep up on all the latest tips and tutorials.
Pin It

Wednesday, June 19, 2013

Craft Station Refresh

 
Materials needed:
Dresser of your choosing
Flat door (I used an old sliding closet door)
Sander
House paint
Screw driver
New drawer knobs
Shelf paper

I have instructions under Refurbished End Table on how to refinish wood furniture.

Just place the door on top of the refinished dresser and you have yourself a crafting work bench.
Try removing some drawers like I did above for exposed slots for items that won't fit as nicely in a drawer.  I then lined the drawers and the empty slots with shelf paper leaving a sleak finished look. 

Keep on crafting kiddies!

If you have any questions or comments leave them below.
Pin It

Sunday, June 16, 2013

Father's Day Gift bag

Father's Day is upon us.

Got your Dad a gift but stumped how to wrap it?  Why not use the Lucky Paper Stars tutorial from earlier this week to make a crafty display of your skills? 
 
Here's what I did for my Dad... 
1. Fold the paper stars over a piece of twine instead of trying to thread it through the stars later.
2. Tie the final string in a bow around the base of the handle.

3. Create a little bag tag with a piece of folded card stock with a hole punched into the corner.  Tie it to the bag and your done.  Personally I would love to do this on a box style wrapping.  You could go really colorful like Rainbow Bright, just maybe not for my Dad.

It may still be cuter than my Dad might have liked but I had to try it and I do think it's pretty.  Maybe too pretty, but I'm starting to think Father's Day isn't really about my Dad any way... Wha-What?
 
 
Thank you always for reading.

Please leave your comments and questions below.

Pin It

Wednesday, June 12, 2013

Crafting Kindle June 2013


Click the image above to get a bargain download now.
The book of the month is Origami For Everyone.  If you were inspired by this weeks post enjoy this discount read through Kindle.
 
Have a great rest of the week and keep on crafting.
 

Thank my Lucky Stars


Instructions for making a Lucky Star below.
 
I hope you enjoyed it.
 
If you have any questions or comments please leave them below.
 
Don't forget to follow me through Pinterest, Gmail, or Facebook.
 
Pin It

Sunday, June 9, 2013

Fresno in 110 degree weather

Oh, Fresno.  My hot sweltering city.  You were 110 degrees of humidity today but I somehow still enjoyed you. 
 
Here is what I saw of you...
An Armenian statue of a warrior.
 
Some California architecture and texture near the Mural District.
 
Our beautiful and historic water tower just in front of our downtown public library.
 
And an abstract sculpture near our courthouse.
 
Just some of the few photos I took with a simple snap digital camera on a quite Saturday morning.
Try being a tourist in your own town or city, you may be amazed by what you find.   
  
Please leave your comments and questions below. 
Keep on crafting kiddies! 
Pin It

Wednesday, June 5, 2013

OMG, it's done

There will be a comical website started shortly and this is the work I have done for it so far...
 
I will be removing the Matrushka doll to create it singularly so that it is a nice button image.  It is a little too much in the header.
 
Here is a separate I did of the Matrushka doll. (P.S. does anyone know the right spelling for the nesting doll?)


If you have comments or questions leave a message below.
 
Thanks so much for reading and keep on crafting kiddies.

Pin It

Sunday, June 2, 2013

What you got, Spam and Rice/ Quinoa?

I don't cook much but, I do have one recipe I really like.  It can be altered by the fresh ingredients I have on hand and it doesn't take much work.  It's Spam and rice, sort of.  That may sound odd, Spam and all, but I had decided to try it for the first time this year and I love it.
Here are the steps it takes to make it.

Ingredients and materials:

1 can Spam
two cups of Veggie of your choosing, I'm using Spinach and Broccoli.
2 cups of Rice (I used a cup of Quinoa and a cup of brown rice)
2 eggs
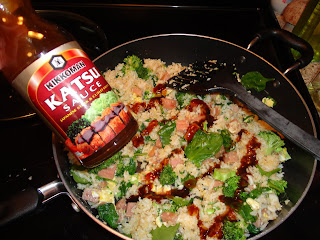
Katsu Sauce (you can use any sauce you want but I prefer this Hawaiian sauce
Saute' pan
Spatula
Rice maker if you have one

Step 1

Chop up the Spam into small bite sized cubes.  Try to make them as uniform as possible.  Brown them in a skillet, no oil needed on Med-high heat.
I use low sodium Spam, but I don't think it makes all that much of a difference to be honest.

Step 2

Cook up the rice.  I used one cup of quinoa and one cup of brown rice in a rice cooker.  They cook up at the same speed and I a able to cook them together.

Step 3

I cut up the broccoli into small pieces and cut the spinach into halves.  I have about two cups of each raw but you can put whatever you want into these two cups. Pineapple, Brussels sprouts, carrots, kale or any other kind of veggie can replace or be added to my choice in veggie.

Step 4

After the Spam has browned put in the two eggs.

Cook the eggs slightly,

add the veggie,

add the rice,

Step 5

Mix in some Katsu sauce o taste and cook on warm until the veggie is tender.  If your veggie is hard like carrots or broccoli than you may want to steam them until they are soft enough. This way you don't over cook the rest.  Once it's mixed you will be done.  I put a bit of Sriracha sauce on the top of the Spam and rice to give a little spice.
Pin It