Sunday, December 29, 2013

You Tubers I like

I'm not feeling so good and I haven't at all been productive this holiday so I am going to give you some You-Tubers I like on polymer clay.


Polymer Clay Tutor is kind of my favorite right now. She focus on really useful tips and is really peppy. Her website is also extremely helpful with a whole community of people helping each other craft.
 
Sugar Charm Shop has realistic teeny tiny charms she is amazing.
 
Cool Rice Bunnies is getting better and better this little lady makes some of the best cutesy charms ever.
 
Lilac Sprinkles gives a great tutorial on glazing plus she is really hard on herself about her charms which means her pieces are fabulous.

Hopefully you enjoy, they're fabulous YouTube videos and tutorials.
Come back on by on Wednesday.  I should have something cool to show then.

Sunday, December 22, 2013

Holiday hours

Ok kiddos.  I've decided that even though it's the perfect time to get wrapping tips, new recipes or even just pictures of my holiday crafting but, I'm going to take sometime off!
So, enjoy your season and craft something great!!!
See you again next Sunday!

Wednesday, December 18, 2013

Cookbook Christmas Card

Already late with the Christmas cards this year?  Me too.  So, I'm going big.  Cookbook greeting card!  I take my favorite winter recipes and put them in a book template in a Word document.  Then I sketched out a cute book cover.  Put it all together, in my case I punched out holes along the sides and put ribbon through the holes as binding.  Now, it is just small enough to fit in a greeting card envelope!
I have to admit, this was my bosses idea which is why this is a food phone.  My husband and I also work on the phone so it works for us too.  Two birds one stone!
Here are the pictures.


Thanks so much for coming by and hope to see you again before the holidays.
Don't forget to follow me on Pinterest, Google + or Email.

Sunday, December 15, 2013

What clay is best?

I had to do some testing recently.  I am sick of my clay crafting cracking and breaking on me.  I did get a whole lot of great clay recently but I was still having trouble!  It was time to research!  Glass Attic was a lot of help but it has a ton of opinions and I have to admit is a little all over the place when it comes in information.  It did help me  find out that temperature is key and it needs to be cooked for at least 15 minutes at 275 degrees Fahrenheit for all the kind of clay I have.  Preheating is very important!  If it doesn't cook at 275 degrees (non-fluctuating temp.) for at least 15 minutes then the plasticizers won't cook off.  Plasticizers are what keep the clay soft so if they don't cook off they then begin to make the clay soft again and that is why they crack and break.  Sometimes the temperature and length of time don't seem to matter if the clay is no good to begin with.  I've seen on Polymer Clay Tutor that if you cook it for 1 hour your clay will be stronger but it gets a little darker.  I did that test too but it didn't seem to matter.  What seemed to matter was the type of clay, and the heat, and length of time cooked.
 
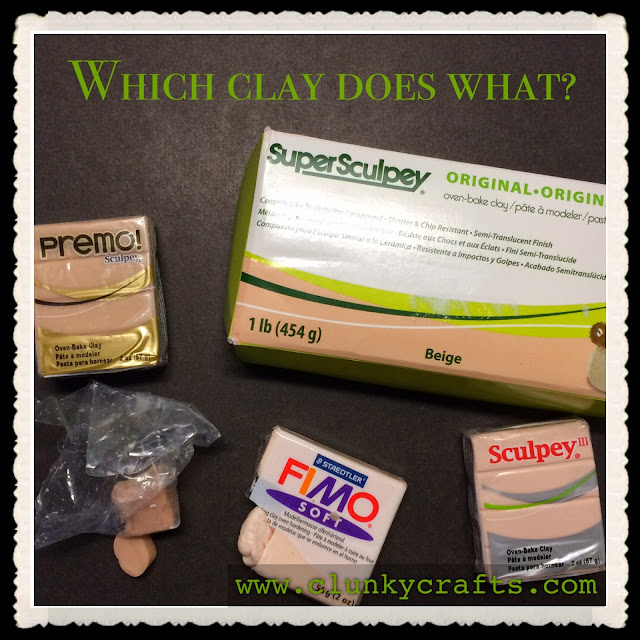
Here is the test I did recently.  I have made Dobby into a clay figure multiple times now using many different clay brands and found some cracked and broke right out of the oven and others would bend completely in half without breaking.  I thought it was just my cooking temperatures first but then realized it was the clay.  Test time!  I had to know which ones I could use and which ones I couldn't.  Let's get down to the findings.

 Just a few of the good and the bad.


Super Scupley will be the death of me! The paint job was great, the whole thing had been glazed then the next then I knew it's nose busted off then the ear next.  I was so mad I almost cried!
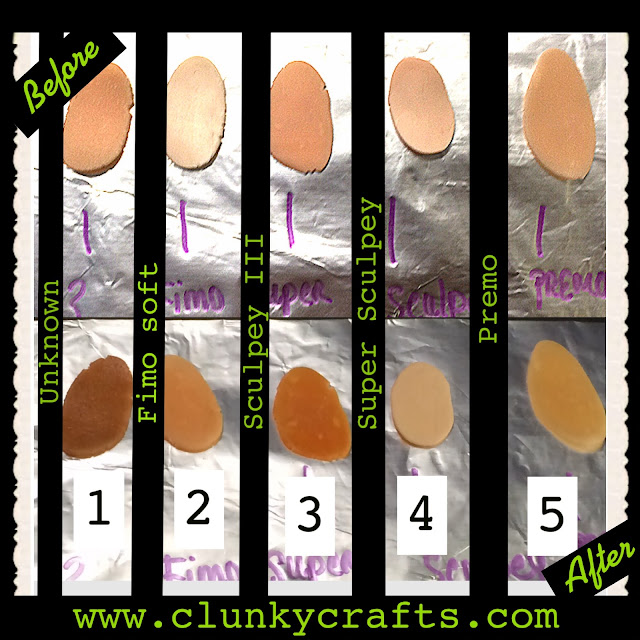
 
The clay pieces were small pea sized pieces pressed through a pasta press #4. 
1. Unknown.  I have no idea how I even got this one but it had been making the most flexible charms I only have a little left... I will be sad when it's gone.  When it is cooked to long it can get a little too dark.
2. Fimo Soft.  Nice tone but too easy to over work.  Think I might try leaching the clay. 
3. Super Sculpey.  I like the over all color, but there is weird sheet slivers in it.  But, really easy to work with and I think I could still use it for more block like designs.
4. Sculpey III.  The color is really pale and really opac.  I didn't like it at all. Plus it is really too soft.
5. Premo.  The color is a little yellow, nicely transparent, and it doesn't isn't hard to work with.1. Unknown.  Fabulously bendable.  I already new it but it was nice to test it out with other clay too.
2. Fimo Soft.  Surprisingly bendable.  I haven't really liked Fimo lately but now, I might reconsider.
3. Super Sculpey.  Huge disappointment.  I thought this was the clay everyone used for clay figurines, I was wrong.  It breaks at the slightest touch, it has these weird sheeting discoloration.
4. Sculpey III.  I thought this stuff was good, I was wrong.  I have a ton of it so I have to find a way to make it worthy.  Maybe mixing it with a clay that is flexible.  It might just make whatever I add to it weaker. :( We'll see.
5. Premo.  Just straight up prefect!  Keeps it's color, bendable, and really easy to work with.
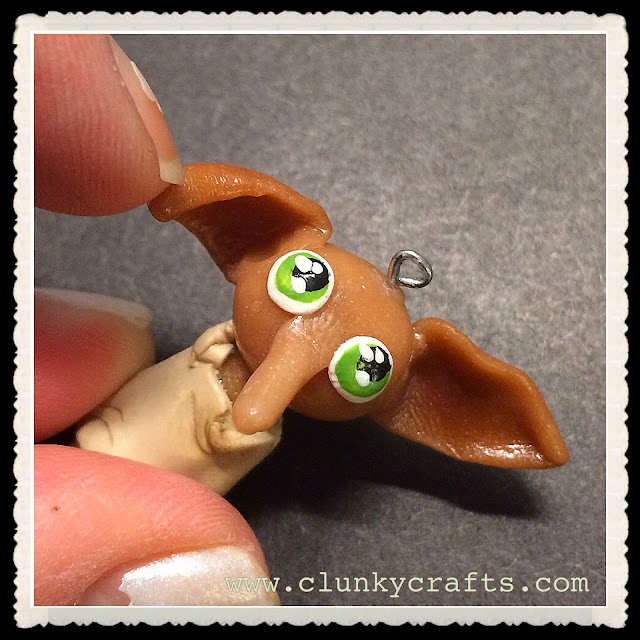
 
Both ears stick out but as you can see they bend really well, great for a charm that will probably be treated roughly.
 
So, to sum up, Super Sculpey is unforgiving and ugly, Fimo Soft, if leached, could be pretty good, Sculpey III is opac and cracks at the slightest touch, and if I ever figure out what #1 Unknown is I will be buying it in bulk!
Thanks for stopping by and don't forget to follow me by Google +, Pinterest, or even just in an Email.
Until then, keep on crafting kiddos.

Thursday, December 12, 2013

December Book of the month 2013


I thought of giving you guys a great craft book for last minute Christmas crafting but, no.  For me How the Grinch Stole Christmas and it's cartoon video counter part were a staple at Christmas time.  I loved Dr. Suess already and the sing along and narrating is something that always makes me think of cherished Christmas memories.  The older I get the harder it is to remember the feeling the season used to give me and the purpose for so much celebrating.  So, here it is, $3.99 on 12/12/13 prices may vary depending on date of purchase of this Kindle download.  I will tell you, these books usually cost $15-$24 dollars and I don't know about you but that is crazy!  With kids using digital media more and more having the physical book isn't as big a deal as it used to be. Shell out the $4.00 bucks and have an amazing holiday.

Thanks for coming by and don't forget to follow me through Google +, Pinterest, or email.
Happy Christmas!

Sick day Apology

I am sorry. Ok? Sorry!  I didn't prep anything for Wednesday then Wednesday came and I got sick.  Spicy food is not my friend.  So, obviously no post. :(  Well, now today is here and I still have nothing to show kiddos. :(  Maybe by tonight I will have gotten it together to atleast give you a book of the month. :) Here's to hoping!
See you kiddos later today, wish me luck.
Thanks for reading and don't forget to follow me every Wednesday and Sunday.

Monday, December 9, 2013

Tardis Cell phone case

I was on Etsy recently and found some amazing polymer clay Tardis cell phone cases.  I read that the person selling them did them on hard plastic shell and so I gave it a shot... Another epic fail out of the test kitchen!  My second one came out much better though.  It's only slightly different then the design sold by Fantastic Visions who is fabulous!  I am not selling them so if you are looking to buy go to Fantastic Visions through Etsy. (I have made links for her Etsy shop all over this blog post) 
My epic fail.  I cooked too fast too long and it melted the plastic case.
 
http://www.etsy.com/shop/FantasticVisions?ref=l2-shopheader-name
Her cost is extremely reasonable so if you are looking for one for yourself Fantastic Visions is the way to go.

I made one for myself and it worked out the second time around.  I'm still doing some tests but I really like the idea of being able to make any kind of cover I want out of polymer clay... like Super Mario, Jim Henson or whatever is inspiring me at the time.
Check it out the words and windows and light on top glow in the dark.  Also a stolen idea.
 
Thanks for reading!
Keep on crafting kiddos.

Wednesday, December 4, 2013

Christmas Food Phone

Working on a sketch style cover for a workplace cookbook/greeting card.  A cookbook greeting card is a collection of recipes from a group of people, like a household, office, or classroom then Xeroxed into stapled books.  You could send these out as greeting cards instead of greeting cards.
I'm not quite done yet but I am almost done with the cover of the book.  So, here you go.
 
Thanks for reading and hope to see you Sunday.
Keep on crafting and DIY-in kiddos.


Sunday, December 1, 2013

Hat Hooks in the Bathroom

  The bathroom... That one place in the house everyone must go.  It's also the one place you may feel limited on décor.  We had been stuck in the same old box-set bathroom fixtures since 1986.  Well my friends it was time for an upgrade.   After finally realizing that I wasn't going to find bathroom fixtures in the bronze I liked cheaply we decided on hooks.  Unfortunately I can't tell you exactly how it was done because, this time I didn't do it all by myself. 
  I can tell you that we did not initially like the hook idea until we saw the hooks mounted on a rectangular block of wood.  Fabulous.  We found the decorative block of wood at Michael's and then painted it white.  Now, unfortunately I don't really know anything else.  I do know that we evenly placed the hooks on the white wood board and then screwed the board into the wall.  I loved that we used a wood panel because it meant we could put this placard anywhere we wanted and find the studs later.  The screws were oddly placed so we filled them with wood paste, sanded them and then I painted over them in white paint. 
 One thing really great about this new set up is I can have wash clothes and towels up and my husband doesn't have to be careful about how he re-hangs the towels.   
The knobs of the cabinetry is new but the towel racks are old and unstable.
4 hooks to make one hand towel rack and one 3 hook regular towel rack.
 
Thanks for reading and come back around on Wednesday to see what's up next!
Keep on crafting kiddies!

Wednesday, November 27, 2013

Fresh Cranberry Sauce, Easier than you think!

 
 Ever hated Cranberry Sauce?  I have... always.  Of course others feel differently about cranberry sauce so we have to have it at Thanksgiving.  There just had to be something better than the canned stuff.  Of course we all know that cranberry sauce hasn't always been in a can so let's learn how to make it ourselves.  By the way this sauce can be made days in advanced, getting just part of a whole day of cooking done a little early.
(P.S. the recipe is found on the back of the cranberry bag, I just cut the sugar by a few tablespoons.  Don't bother with a crockpot recipe, it's too easy for that.)


 First get your ingredients.
1 cup of water
1 cup of sugar
One 12 oz bag if cranberries
Med sauce pan
 
Mix the water and the sugar on med-high heat until the sugar dissolves.
Bring the water to a boil and then add the bag of cranberries.  
Cook on a low boil until the cranberries start to pop.  Not all cranberries will pop so there is no need to cook until they do.  This is were our own personal opinion comes in, you can cook until all of the liquid cooks off or leave a little of the water behind so you have a bit more of a juicy cranberry sauce.
 
Enjoy your fresh cranberry sauce!
 
Thanks for visiting and don't forget to follow me through Pinterest, Google +, or eMail.
Keep on crafting kiddies!

Sunday, November 24, 2013

Doctor Who Costumes and bags

If you didn't already know I am a Doctor Who fan.  I am not British and wasn't raised watching it and it is a little hard for me to watch the classic Doctor Who episodes but the new stuff is flipping awesome.  Knowing this you must be able to appreciate how excited I am about the 50th anniversary movie.  I have already seen it at a viewing party at a friend's house.  We went dressed up as the Tenth Doctor and the Eleventh Doctor.  I needed more after the viewing so, we are of course going to the theater on Monday 25th,2013 for a viewing in 3D.  I wasn't going to the theater in costume but I have to show my fandom so I made a duck tape purse and wallet combo.
Thanks for reading and hope to see you before Thanksgiving, Wednesday night.
Keep on crafting and DIY-in kiddos!

Saturday, November 23, 2013

Fangirl 2013

I am ecstatic people!  I didn't really start to get excited until I watched the amazing Catching Fire.  Amazing doesn't cover it, moving, book worthy, fabulous, and of course "satisfying" (my brother in laws words). After seeing one of my favorite book series treated with such justice my excitement for Doctor Who's 50th anniversary episode amped up a bit.  I am seriously stoked and am just sad I made myself absolutely no swag for it! 😩 
Seriously I am not the only one on pins and needles, just check out Google.

It's not just Doctor Who I'm chomping at the bit for, The Hobbit will be here soon and I love that Lee Pace (Pushing Daisies) will have a major part in it but even more pleased that benedict Cumberbatch is voicing Smaug!
Now if only I didn't have to wait until 2014 for BBC's Sherlock everything would be perfect.
Thanks for hearing my rant. Check in with me Sunday.
Keep on crafting and geek in' out kiddos! 😁

Wednesday, November 20, 2013

Duck Tape Owl Wallet

Ugh!  Going to a smaller purse is hard.  I think the hardest part about it was switching to a smaller wallet!  I went from having practically a mini-purse for a wallet to coin purse for a wallet.  It just wasn't working, my cards were so tight I couldn't stick my fingers in it to get any of them out.  Time to make a new wallet!
The first one didn't go over well.  Can you blame me?  I didn't have a template or pattern so it's learn as you go.  But I think the second one came out much better. I'm still working out the coin situation and it's not closing perfectly yet but the overall look and functionality works. 
Hope you like it too.
 
Thanks for stopping by, sorry I was so late.
See you every Wednesday and Sunday... maybe late but I'll be there. :)


Sunday, November 17, 2013

Progress and new project

Of course I have been hinting at redoing our bathrooms... but, for some reason I haven't wanted to show you anything until I have completely finished so I have a proper before and after.  Once that is done I will talk a little about all of the different things we have done.  But, to give you a little something here are some images of the fixtures in the bathroom now and what we plan on slowly changing them to.
None of the fixtures match and we just got the knobs for the cabinets (which I really like)... unfortunately brass is a hard metal tone to find now.  So, decisions need to be made.  You can also see the fixtures we have are not holding together very well as shown in the bottom left image.
 
My Mother and I found these bronze hooks and decided that putting them on a board and using the hooks to hold the towels would be the best solution.  The choice was made because bronze fixtures are hard to find and we are super cheap so we don't want it if we have to go buy it from a fancy to do home store.
 
Our inspiration was based on the hooks we had in the bathroom first but decided against because they were so far apart it looked odd.  Then it hit us!  Why not buy just a few more hooks and put them all on a board.  It will look much better.  Above is our inspiration.  We already got the board from Michael's and the hooks from Home Depot.  This is going to be awesome!
 
Check in with me later and don't forget to follow me through Google +, Pinterest, or Email.
Ta-Ta for now kiddies.

Wednesday, November 13, 2013

Ribbon Board for Eye Glasses

Really need a place for your multitude of glasses, and sunglasses?  Me too.  At a spur of the moment I grabbed up a loose piece of fabric with, some spare grosgrain ribbon, a stapler, and a small stretched canvas.  (You could use any piece of wood as long as you can stretch fabric over and staple it down.)

Here’s what you do:
 
Get your supplies:
Stapler
Frame or stretched canvas
Fabric cut an inch bigger than your frame
Ribbon
Scissors
Step 1
Cut your fabric at least an inch bigger than the border of your frame.
Step 2
Flip your frame over face down on top of your piece of fabric which should also be face down. 
Step 3
Staple the middle sections of the fabric down the sides of the wood frame.  If you pull taught the fabric should not wrinkle or look uneven.  Once the centers of each side have been stapled down you can continue stapling out from the center out.  Once you get to the corners it gets trickier.  Because it is the back there is no need to be pretty about it.  I fold the fabric into one side then take the rest of the fabric and fold it over to the other side of the corner.  You should have a sort “V” shape or like a flattened cone.  **I am doing a terrible job describing this action… it won’t matter, no one will see it.**
Step 4
I don’t have a image for this but this is where you take the ribbon and place it in any directionality you would like then staple it down the frame on the back tightly.  I just did lines across which I kind of regret and may do differently later because my glasses don’t lay separately.  I even feel like I might prefer this vertical instead of diagonal because of the directionality the glasses must hang. 
Have fun with it!  Hope this gives you some good ideas.  If you wanted more of a multipurpose board you could do this over a cork board or you could create a more cushioned board just by adding some poly-fill, there are all sorts of options.  Anyway, have a great day and I hope to see you all soon.
Don’t forget to follow me on Goggle +, Pinterest, or Email.

Tuesday, November 12, 2013

November book of the month

So if you remember a couple of months back I ran into a treasure trove of wine corks.  It's time to do something else with them but what?  Well, I found this free how to book using wine bottles and corks.  Time to get to work. 
Click the picture above to get the free Kindle download yourself.
Check in with me on Sunday to see what's going on.
And don't forget to follow me through Google.

Sunday, November 10, 2013

Ice Cream Cookies

I really wanted Ice Cream cookies like It's-It ice cream.  I know it seems odd in the middle of fall but I live in Fresno, CA and it is hot all the time.  Anyway, we made them.  Here are the simple steps to make them yourself. 
 
1. Get Ice cream.
2. Get Cookies.
3. Put a scoop of Ice cream onto the inside of one cookie.
4. Squish the two cookies together then put it in baggies in the freezer for about an hour. 
 Ready to enjoy for much cheaper and possibly healthier.  Probably not though!
 
Thanks for coming by and hope to see you next week.

Wednesday, November 6, 2013

Cup Speaker

I am remodeling the bathroom which means I am painting, sanding and so forth.  I just got a new phone and I don't have a speaker system for it, which means I needed to amplify my speaker system somehow.  Of course Pinterest had a way.  You take a large cup, best to be glass, and just stuff your device in speaker down seemed best.  What you get is a slightly amplified sound for no extra cost.  Awesome!
 
See you this weekend and don't forget to follow me on Blogger, Google + or Pinterest.
Keep on crafting kiddies.

Sunday, November 3, 2013

Christmas Gift Exchange idea

Thinking small this year.


There is no way I will be able to buy just one gift this year but I am getting closer.  This year I posed an idea to my family and in-laws, of a gift exchange, or secret Santa if you will.  They were for it. What it means is we will choose a name and only buy a gift for that one person.  I gave all the members participating a plain envelope with a recipe card inside and instruction to write their name on the recipe card and 5 or more gift ideas on the card.  We will then draw an envelope on Thanksgiving day (pick a card, any card) and whoever you pick you get one or more gifts for, not totaling more than $50.  Then of course by Christmas we will exchange gifts and reveal ourselves as the secret Santa.  Maybe in the future it will get a little bigger so more than our immediate family will be in on it and more money will be saved.  Christmas will once again become about Christ and family togetherness and not material things.  I think I'm going to like this tradition. 😍

Thanks for reading and keep on crafting and DIY-ing kiddies.

Saturday, November 2, 2013

Geodesic nightmare dome


Domed Nightmare
Pretty, or is it?
Why is there an AC unit stuck in the wall?
How many angles can you get in one corner?
Why are there two plugs right next to each other at such odd angles?

Just looked at a geodesic dome home today which I thought would be awesome with all sorts of interest to it.  We'll, it was interesting all right!  My realtor had mentioned these words to me about it, "it's sort of reminds me of the Winchester Mystery house".  Those of you who don't live in California might not know but the Winchester Mystery house is a house built by Mrs. Winchester with stairs leading nowhere, doors that open to brick walls and so forth.  Supposedly she was trying to trick or ward off the ghosts killed by her husbands rifles.  So, to say the least the house I was to look at today was going to be quirky. 
I took some pictures and they don't do its strangeness justice, but I will show you anyway.  
Just so you know there were vents on the floors in the middle of the rooms, lights at the strangest angles on the ceilings and walls, and corners where there was no reason for a corner. As if a piece of the wall had just jetted out of the stucco at random.  Hard, very hard to describe. 

Thanks for popping by. See you tomorrow night.


Wednesday, October 30, 2013

Fake Zuppa Toscana Recipe


My husband loves the potato, kale and sausage soup they have at Olive Garden.  And, if you hadn't noticed already I think I am becoming obsessed with soup.  So, I hunted out a recipe and this one works!  It serves about a dozen people though and I have made a few modifications because I felt it came out too thick.   I think this could actually serve about 17 people now. I hope you enjoy.
Fake Zuppa Toscana Soup
Serves: 12
Time: 35 minutes

 Ingredients:
2 Bunches of Kale or 1 large bunch
12 Whole Red potatoes thinly sliced
1Whole onion (I ground mine to a pulp)
1 1/2 Lb of Italian sweet Sausage (you could go spicy too)
1/2 t Red Pepper flakes (you may want to use less if using spicy sausage or not)
4 C Low Sodium Chicken Broth
2 C Whole Milk
Or
4 C Half & Half
Or
1/2 C Heavy Cream
Fresh or dried Oregano to taste
Black Pepper to taste 

Need: 
 stock pot
sauté pan
ladle
spatula or spoon
food processor or just a chopping knife.


Let's get cooking.

First prep the Kale by washing it and tearing the leaves away from the stalk and ripping the Kale leaves into bite sized pieces. Put aside.

  Now prep the potatoes by washing them and slicing them with the skin on into thin 2 cm sheets.  Then boil until tender not mushy drain and set aside.

 Chop up the onion into small pieces.  My family prefers the taste of onion but no evidence of onion so I pulverized them in the food processor.

Take the sausage out of it's casing and cook until gray brown while continuing to break it into pieces.  Drain the sausage and then take the sausage and chopped it in the food processor until they were more pea sized to thumb sized bites.  You could also try cooking it in bite sized pieces by I found that hard to do.

Cook for two minutes the remainder of sausage and the ground onion in the sausage pan at medium heat.

Stir together in a stock pot the sausage, red pepper flakes, oregano, chicken broth, milk, and half & half and let simmer for 30 min or less. You just want to thicken up the liquid a little and bring together the ingredients.

 Add the potatoes and check the consistency and add more chicken broth or heavy cream if it is too thick for your liking or too thin.  Mix in the Kale last and simmer for another 10 or more minutes until the Kale is incorporated and slightly softened.  

Time to eat! 
You have a ton here so you could either have up to 12 serving of this or you could put some in the freezer for later.

Thanks so much for reading and keep on crafting kiddos.