Sunday, September 29, 2013

Owl Post Gift wrapping

I wanted to wrap my brother in laws gift nicely but didn't want to go too girly so I went with Harry Potter's Owl Post style.  It isn't brown parchment paper it is actually gold wrapping paper.  I thought it snazzies up a the package.  Then I just wrapped twine around it and thread that through a Snitch key chain I made based on the Harry Potter series.
Here you go.
I wrapped a video game for my brother in-law's birthday.  He likes Harry Potter, only likes it but I really wanted to pass this little baby on.
Thanks for visiting and keep on crafting kiddies.

Wednesday, September 25, 2013

Epic Fail Cell Phone cases

I have tried to make a couple of cell phone cases with clear silicone caulking and I epically failed!  There are no words.  I finally get a smart phone and I really wanted to create my own phone case.  But, this was bad!
This was suppose to be a Dark Crystal patch with clear silicone on top to create a more protective case.  The clear silicone was not as clear as I thought and now I have forever lost the use of such a cool patch!
The key was from Disneyland and it was already broken in half so I didn't mind using it but the key top was pushed down too far and the clear coating wasn't put on very well. 
Not happy.  Epic Fail!
 
On a positive note I can totally use this clear silicone for glaze or snot or slime on other craft.  Good to know. **Blegh**
 
Thanks for reading and with all of the things I need to do over this week I should have a whole lot more choices of good posts to show you Sunday.
Keep on crafting kiddies.
 

Sunday, September 22, 2013

Trip to Universal Studios, CA

Day trips


And yes, that is my finger. What?  It's a new phone.
 
Well, our anniversary was coming up quickly and we didn't know what we were going to do.  We are saving up for a house but didn't want to do nothing.  The idea of just going out to eat bore me to tears but our semi-annual trip to Disneyland was just not possible... only because we are going in December (ha!).  What to do?
Then it hit me!  Well, actually it hit my friend.  Take a trip to the town over on the train and just walk around, hang out in the park, and eat at the local fountain shop.  It would be great.  My friend has a set of triplets and they had just taken the trip to Hanford on the train with their daycare group.  Here they are below.  Awe aren't they cute? Shane, Bryce, and Reese wearing caps and bandanas the daycare provided and of course the outfits were my friend's idea.  This family doesn't do anything small!
The trip was a great idea!  The kids got to ride a train, see a different town, and eat ice cream.  Now that was what we should do, and it's what we planned on doing up until a week out.  I was looking for a coupon when I stumbled across our tickets to Universal Studios.  My husband and his family took a trip to Universal Studios last year for his brother's birthday and being me I purchased a 2 day pass because they cost just as much as one day passes.  Well, a whole year had passed and if we didn't go now the second day would be wasted.  So we went.  Here are some pictures of our trip.  I took these with my brand new iPhone 5s.  This is my first smart phone (I am a little behind the times) but it took great pictures and I was able to load my trip up to Instagram instantly.  Very exciting. 
 
 
They had actual puppetry in the Universal Studios memorabilia room.
This was Coraline, but they also had ParaNorman and a ton of stuff from other Universal Studios films and TV.
This was the 45 minute wait we had in the sun at the Studio Tours ride.  There was a whole other batch of people waiting to the right for a whole hour to ride it in a different language. 
 
Hope you enjoyed my blather and to hear more come back Wednesday.
 

Wednesday, September 18, 2013

Free on your Birthday

 
I am a bargainer!  I don't like to work that hard for a bargain though.  I won't sit around for hours on end clipping coupons just to get .30 cents off toilet paper.  That being said, I will pick through the internet with a fine tooth comb to for hours if it means I’ll save $5+ or even get something for free.
For example; I will be taking a free trip to Universal Studios this Saturday because my husband and I bought a 2 day pass which is good a year after 1st use.  We bought the 2 day ticket in the first place because they cost the same as a 1 day pass when bought at Costco. Good deal!    
Birthday's are coming around and I love going somewhere special but, I also like special prices.  Because of that we will eat out for almost the whole month at special places and not so special places.  Some of the places we partake would be Denny's which offers a free meal on your actual birthday as long as you can prove a valid ID, Baskin Robbins offers a coupon for “something” free in your email, or my favorite, Starbuck’s gives a free drink of your choice in your birthday month with a coupon or gold level Starbucks card.  These are just a few and they are usually food, but if it means I only have to pay for one meal that day or night than I am all for it!  I am not going to reinvent the wheel here so here are some links to websites that have made the lists for me of freebies out there.  Some of these lists also include retailers and entertainment like Boomers.
Just to throw it out there, in case they aren’t on the list, Regal Cinemas offers a Regal Card for free and every time you use it you earn points for free things.  You do nothing and you will get free popcorn every Tuesday and free movies after enough points have accumulated.  We also double up the savings by purchasing the tickets with my work at a discount.  Well worth it to me just by keeping an extra card in my wallet.
 Ask your local retailer, entertainer or restaurant if they have any sort of rewards program.  You might save yourself a lot of time and money, and you have to admit we could all use more of both.  *Offers may vary by region or business.
 
Thanks for reading and check in on Sunday.
Don't forget to follow me or pin this on Pinterest.


Sunday, September 15, 2013

Fast Fish Tacos

Want some fish tacos but want them fast?  Don't worry, I have your recipe right here. 
If you think fish tacos are super hard to do and there is no way you can get the chipotle cream sauce to taste like it does in the restaurant you would be wrong.  I took my first attempt at making fish tacos today because I saw some Tilapia fish on special at the market.  I looked at my husband and said, "Do you want to try fish tacos this weekend?"  He's always willing to let me try cooking something new as long as he doesn't have to do it.  We checked on his smart phone for some ideas on how to make the chipotle cream sauce in the grocery store and picked up a few extra items to fill the tacos and then we were off.  Get ready, here we go with quick and easy tacos.
Ingredients:
(Feel free to add and subtract ingredients from these recipes... I always do. :)
For the taco:
2+ pieces or 1lb White fish of your choice. (Tilapia, Cod, Halibut)
**We aren't breading the fish so how much fish you cook is up to you**
Salt (to taste)
Yellow corn tortillas
Cabbage or lettuce
Pico De Gallo (or just chopped tomatoes, onion, cilantro bunch allowing for different taste)
Lemon slices
Radish slices
Avocado slices or Avocado sauce

Chipotle cream sauce:
1 small can of Chipotle in Adobo
1T of Lemon or Lime juice
2T Mayonnaise
1T Sour Cream
*The Sour Cream and Mayo can be replaced with Mexican Crema*
Canola Oil as needed

Tools:
2 Skillets (one for tortillas and one for Fish)
Spatula
Tongs (if you have them)
Food Processor (any blender/chopper will work)

Let's get to cutting and mixing!
1.  First thing you should do is prep the toppings.
The can of Chipotle Chile in Adobo needs to be processed because they are whole.  Pour the entire can into a food processor and grind until it is a chunky spread.
2. Take the mayo, sour cream, lemon juice, 4T of Chipotle spread and mixed it all together.  (you will have a bit more chipotle spread left which you could freeze to keep for later)
3. Shred cabbage and chop tomatoes, onion, and about 5 sprigs of cilantro.  *This is all to taste so cut until you feel you've made enough.*  This will make a Pico De Gallo and cabbage slaw or you can keep it all separate so people can choose from the toppings.

Are you ready to start cooking?
 You can do both the tortillas and fish at the same time.  The fish doesn't take very long to cook so you will not have a long wait before the fish is ready to go.
4. Get your skillets on the burners with a drizzle of canola oil on the base of both at heat at medium.  Once the oil is hot, place up to two pieces of fish on one pan with a sprinkling of salt on the fish.  Put one tortilla on the other skillet.  (The fish will not need much else because the sauce will be it's seasoning)
5.  Let the fish cook on both sides for about 3-5 minutes cooking time on both sides and the tortillas should be flipped once at about 1-2 minute intervals.
6.  The fish is done when it breaks apart with a fork but don't over cook it to the point at which the flakes are sharp plastic like sheets and the sides turn brown.  At most they should be light golden.  The key is this white fish should still basically look white. *Truly, the fish in a medium heated oil coated pan will do all the work for you.  If you have never cooked fish before don't worry.  Just do not it cook on high and you will be fine.
7.  Now that the tortillas and fish are done chunk out half a piece of fish with a fork onto each tortilla and allow each person to top it themselves.
Done!
Don't look at your masterpiece too long!  Get to eating!  I promise you, even with each step broken up this should only take about 20 minutes to make a meal for 4 people.
Enjoy it!  Make it your own by changing toppings, change out the fish, or try a different sauce.  I kept the fish simple with a pan fried with light canola oil but you could try batter frying it, and add jack cheese to make it a more California Baja style fish taco. (batter frying will definitely change the health level of this meal and it will take longer to prep and finish.) Please don't be afraid to take a chance on something new and change up the recipe to your tastes, I won't be offended! 
If you think you have a better recipe, let us know.  Leave a link or comment below on your take on a fish taco recipe
All right I think I have talked enough now.  Ahhh!
Thanks for reading my latest blurb and hope to see you Wednesday.  Who knows what I will be up to?

Thursday, September 12, 2013

September Book of the Month

WOW-WEE! Just saying...
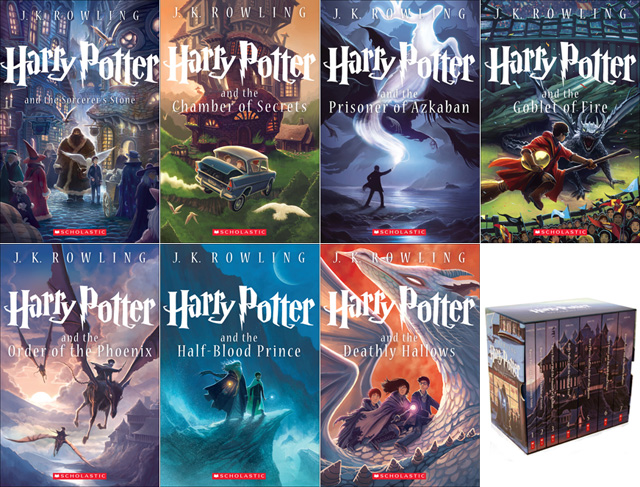
Special Edition Harry Potter Paperback Box Set
**click above to buy or view prices**

 
Considering how much I love Harry Potter it's no surprise how pleased I was to see the 15th Anniversary edition come out.  It was a fabulous idea.  It has been 15 years since the series started so there is an entirely new generation ready to enjoy the magic.  This series is the entire box set as shown above and is approximately $55.00 (US) **prices are subject to change**.  That magically affordable price for a 7 book series is do to the books all being paper back.  Now, if you feel soft bounds don't have shelf appeal you'd be wrong.  When you have all of these books together in a sweetly decorated box then you can see the Hogwarts castle in all it's glory at twilight.  So, consider buying the entire series if you haven't already, because if you start one book you will want to read one you will want to read them all.  I promise! :)
 
Thanks for stopping by and keep your imaginations going with books, crafts and art!
 

Wednesday, September 11, 2013

Bag Popcorn vs Bowl Popcorn

Hello Popcorn Lovers!


This was my attempt with the bowl.

Not so great... :(
I have been trying to figure out the best way to make a lot of popcorn without a machine and without a ton of processed pre-bagged popcorn.  I was super excited when I found out that you could take a glass bowl and a plate to make popcorn.  I tried it.  You take 1/4C of popping corn, put it at the bottom of the bowl and then place the plate on top.  Stick it in the microwave and let it cook for 1.75 minutes or longer/shorter depending on your microwave.  Just listen for it to make sure you aren't going more than 3 seconds between pops or your popcorn will burn.   I was more disappointed when I tried it and it didn't really work.  Most of the kernels didn't pop and the bowl was so hot you couldn't touch it without a hot mitt.  That is when my Dad told me, "when I was a kid we used to take a brown paper bag seal it up and then microwave it."  That made perfect sense, and I am sure there is a tutorial out there somewhere but I just took the same requirements needed for my  bowl popcorn, used the Popcorn feature on my microwave and got to cooking.  It turned out great!  It basically had the same concept of the paper bag popcorn.  There were of course a few un-popped kernels but the cool thing is you can put them back and re-pop the un-popped.
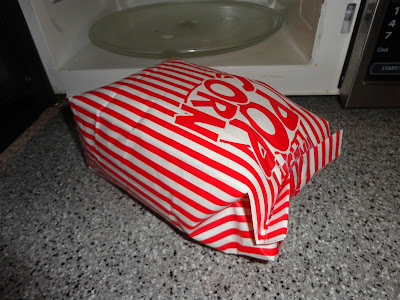
Here is my attempt at the paper bag idea.
 A paper bag, some scotch tape, and some popping corn and you got yourself some Popcorn.
Put in 1/4th cup of popcorn, fold twice and seal with a small piece of scotch tape.
After double folding lay it flat fold side up, just like you would a microwaveable popcorn bag.
Pop until it the popping becomes slower.  You don't want it to burn so if it is 3 seconds between pops take it out!
  Let it cool slightly then unseal the bag.  Put whatever topping you want or no topping and you have home made popcorn without all the preservatives or cost.
 
Thanks so much for reading kiddies and keep on crafting, DIY-in, and saving the world.  **He-He!
Don't forget to follow me and if you like what you see pin me onto Pinterest.
 

Sunday, September 8, 2013

Projects, projects, nothing done...

So, I don't really have much to say.  I have been lazy and my projects are building up behind me.  I need to reorganize all of my new clay and equipment.  I need to create a cover for a quirky mystery novel and then, I just need to do some art already.  Off I go to get to work.  I leave you with just one small picture of the organizing I have ahead of me.
Do you have any helpful tips and hints on how to organize so much clay, tools and already made charms ?  Let me know, comment below, send me a link, or email me.
Thank you all for reading kiddies and please leave comments below and don't forget to visit me every Wednesday and Sunday.

Wednesday, September 4, 2013

Indiana Jones Themed Movie Night

We've got Coffy in the grass just relaxing before all of the excitement began.  Another movie night is upon us.  We set up the projector screen, the chairs and even a table for dining at before night fell.
Indiana Jones Raiders of the Lost Ark here we come. 
We found a pink foam cowgirl hat at the 99 Cent Only store which I painted brown.  It looked just like suede (Indiana Jones' had differing from popular belief is not leather but actually felt).  I even got table Tiki torches from the 99 Cent Only store.  I think they were left over from the summer season.
 
My Mom and I worked together to create the map.  The plane is actually a foam toy and we just painted it gray.  It just made one step easier.  The nice thing was it glued on easy enough because it was light weight foam and bended easily enough.
The Aladdin "Abu" monkey was guarding the Dates and you all saw on Sunday my post on how to make the Ark of the Covenant.  All of the candles were found at the $1 Store but they were left over from the last movie night.  I left the candles inside so I wouldn't have to worry about them being blown out.  I also had all the torches set up and the paper lanterns with battery operated flickering tea lights.
Hope you all liked the total look.  We didn't work at the whole party or put a whole lot of money into it but over all it had a theme and everyone had a really good talk and then a relaxing time watching a great movie.  Hope this helps you know that you can put together a great party too on a budget.  We spent about $25 including the candles we bought last time on the decorations.  Granted we bought food too but we also asked our guests to pitch in the sides. 
Apologies for no night shots.  We had too much fun and everyone helped clean up after.  No after shots were allowed.  *ha-ha* 

Just remember, even if your short on funds doesn't mean you can't throw a part with your friends.  They want to gather as much as you do.  It doesn't mean you have to be stuck with a huge bill.  Let your friends help. :)
Keep on crafting kiddos and check back with me on Sunday to see what's up. 

Sunday, September 1, 2013

Ark of the Covenant Ice Chest

Believe it or not I will show you how to turn this strange assortment of toys and such into an Ark of the Covenant as seen in Indiana Jones Raiders of the Lost Ark.
Materials:
Two small action figures or even angel figurines would work
Foam paper or something that could be made into wings
Glue (I used a glue gun)
Gold spray paint
Stryofoam Ice Chest or a plastic one you wouldn't mind painting. 
Cut out the wings and glue them down to the arms of each action figure.
Then glue down the action figures to the top of the ice chest.
Take your ice chest with glued down angels and spray lightly with the gold spray paint.
Make sure to do 3 light coats as to not get the Styrofoam to bubble.  Styrofoam doesn't really like spray paint. 
I personally would have used paint but this was very last minute.  The angels would have been much prettier but I had about an hour to do all of this for our Indian Jones themed party.  I really like spraying stuff with gold though, it makes it all look so much better.
 P.S. Rust-o-leum Gold Metallic is the way to go.
And you are done. 
I found the hat at the 99 Cent only store and got the action figures and the foam paper at $1 Tree.
I wish I had more time for this but it came out so cute and a little bit whimsical I am very happy with it.
Thanks for reading and catch up with me Wednesday to see how it all turned out.
Don't forget to follow me on Google+ or Pinterest.