Friday, April 26, 2013

Duck Tape Rose Bouquet

   So, although my focus is suppose to be on wine corks and chalkboards, it isn't. This time it was a good cause.  A friend needed an emergency bouquet for someone who needed cheering up.  I hope this does the job.


My prayers go out to the family.
 
Click to the Duck Tape photo to the right for more pictures of Duck Tape work.

Tuesday, April 23, 2013

Chalkboard Project Progress


   To start my chalkboard with a wine cork frame I made a list of all the things I would need.  I thought, if I could find a chalkboard than I could create the frame myself, add the hangers on the back then BOOM! I'm done. I was wrong. 

   I started my search at Michael's for a boring black chalk board with no frame.  I was shocked to find they did not have any chalkboards.  Not one.  So I stopped at GW School Supplies (where I wanted to go initially) and they definitely had plain chalkboards but they were all green, and the black one was framed and sort of a plastic not a wood board.  This would not be rustic enough so I gave up the search for the chalkboard.  I decided the only way people have a chalkboard now is to do it myself with Chalkboard Paint.  So I went straight to Home Depot and picked up a can of black Rust-Oleum Chalkboard spray paint for $4.99. 

  My new plan is to find a frame from a thrift store so I don't have to work it all from scratch.  I plan to just paint the wood and glue down all the other items onto then I should be done.  Who knows right now?  This weekend was a bust so wish me luck on my search for a thrift store frame that will do the job.
Comments and Questions below


Thanks for reading and keep on crafting!

Wednesday, April 17, 2013

Future Cork project

  I have recently run into a butt-load of wine corks from a good friend and she has asked me to do a project for her.  She has been building this collection up for quite some time and I have enough for a few projects.  She is allowing me to keep the rest so you will probably see a few cork projects for a while.
 
  It's really funny because I just realized I have probably forgotten a few projects I was going to do and really need to start a list.
 
  So, this weekend I will be making a chic black chalk board with a lovely tile on the top and the corks framing it.  The tile provided is gorgeous and I hope I can do it justice.  Stay tuned (HAHA!) for a detailed tutorial and pictures of the final piece.

Monday, April 15, 2013

DIY DVD Slim Sleeve Tutorial


 Recently, I had been trying to condense my MASSIVE DVD collection into a super sleek space saving system!  I was failing miserably.  I wanted something that would hold my covers and multi disks all in one containment like the box they come in except thinner.  I had most of my films in DVD binders and the cover sleeves in separate binders in plastic sleeves.  It was so disjointed and made it very difficult for me to give away a film or sell when I felt like it with out a whole lot of searching for the paper sleeve and its corresponding disks. 
 When I scoured the Internet I found the answer, Atlantic plastic DVD/CD Sleeves.  They were perfect until I saw the price!  15 sleeves for $15-$20!  With over 600 DVD's that wasn't going to happen!  I looked for any other version or even some "how to" tutorials and found nothing.  After a lot of trial and error and a huge search for the right materials this is what I came up with.

Enjoy this step by step tutorial on making your own DIY DVD Sleeves!


The Materials 

Manila envelopes or any lightweight cardstock (Cereal Boxes, soda boxes, old folders, etc.)
Scissors or Rolling Razor Blade
Cheap Ruler
Plastic Binder sleeves
Hot glue gun
and
Paper CD envelopes it's best to go with Tyvek CD Sleeves (they may seem pricey but they are but far the best choice for your disks.  They are the same thing Netflix uses.)
Now lets get started... Step 1

Take your Manila folder (or whatever you have available) and cut vertically away from the seam at 6" wide.  I have extra long manila's here so I get 2 with left over scrap.  If you are using regular sized folders than you will have to make them about 3 cm smaller to accommodate for the smaller width.

Step 2
Time to cut off the tops of these folders.  Make sure not to cut at the fold line and cut the tops down so the folder is 6x8.25". If you are using other card stock and could not make a fold that will not matter later it will just mean you will have to cut two sheets not just one.

Step 3
The plastic sleeve I am using is smaller than normal so I could only get one 7x7" piece out of it.  I can get two out of one 8x10" sheet.  You will want to cut off the spine and the connected bottom.  Don't worry if it isn't perfect.
 Just make sure it is 7x7" around.

Step 4
Unfold the Manila envelope so the inside is visible.  Place the folder fold line up over the plastic square.  It should be sticking out about an inch all around the three sides.  The small space left by the fold line is for the DVD cover to slip into. 
Step 5
This is where the ruler comes in.  I would have a lot of burned little fingers for it not for a 3 pack of $1 Tree rulers!  So, from the bottom glue and fold the plastic onto the inside of the manila envelope.  As you glue the plastic and cardstock together use the ruler to apply presser instead of using your fingers.  You should have a nice flat glue line now.
Step 6
*sorry for the picture
Onto the sides you will want to do the same glue technique but fold in the corners first.  You will want them as clean and flat as possible to keep your sleeves thin and sleek.


Step 7
a little combo

Now apply glue lines on the opposite piece of the manila envelope sealing the plastic side to the other piece of paper.
Move quickly and use your ruler to adhere together.  If you wait to long the glue will become to cool and not hold for very long.
Step 8
We are almost done now.  Time to take out those slightly fuzzy paper CD envelopes.  As in the image, flip over the envelope window side down. Also flip your sealed sleeve shiny side down with the fold line as the "top". Ok, now no need to get crazy with the glue here, you don't want to accidently glue it together, so just put for drops of glue at each corner of the envelope and adhere it to the middle of the envelope.  You can glue the envelope anywhere you'd like but the middle is more balanced.  I tried staggering them but didn't like the effect.  Also, I feel I need to point out that this is just one disk but as shown in the final photo at the top of the page it is important to know if you need more than one envelope before you being gluing.  I had to redo many finished sleeves because I forgot a special feature disk.

Last Step
Folding your DVD sleeve.  It's pretty self explanatory but just for tutorial reasons I will explain the image shortly.  I didn't like the idea of destroying any original covers and such so I just used the back fold line that was already there to fold it down flatter.  Then just inserted in through the space left at the top of the sleeve.

PRESTA-DIGA-TANO! YOUR DONE!


I finished my organizational overhaul with My Movies program.  I arduously input all of my movie titles into this program so I never having to re-organize just because I added a film to my collection.  This program gave me numbers associated to the films so I put a number on the corners and then put  them in numerical order.  Anytime I get a new disk I add it to my My Movies collection and then to the back of the line of my disk collection.  You could do the same thing with an Excel spread sheet. 

Here is a picture of my final collection.

Hope you enjoyed reading and crafting with me.  If you have any comments or questions comment below.  Also, don't be afraid to make this your own with as many found and recycled items you can get your hands on.  Most of my materials came from business recycling bins and old school binders.
Thanks for reading.
Have fun and keep on DIY-in kids!
Please comment below

Pin It

Outdoor Movie Night


http://www.clunkycrafts.com/2013/04/outdoor-projector-screen-tutorial.html
click for a tutorial DIY projector screen


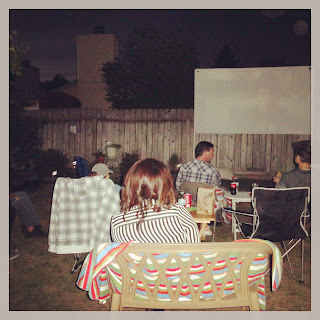
Well Friends, how did the projector screen pan out? Amazing!


My husband Al and I invited approximately six or so people over for hotdogs, candy, popcorn and sodas and a movie. We only asked that if you wanted to drink you bring your own and if you wanted to sit... bring your own. Ha-Ha-Ha! Any who, it was a success! The movie is not perfect on our cheap little bargain projector but for old movies and black and whites it's not bad. We watched The Princess Bride and to be courteous we let all of our neighbors know about the late night noise (a small typed letter can go a long way to keep a neighbor happy).
We kept the décor simple, just some electric candles on the Snack table and paper bags with quotes from the movie on it for the popcorn.  I didn't want to go to overboard for the first time but I had to give it a little something.  Next time I will definitely have our TV trays out and blankets just in case.
We all had such a good time and everyone was game for another movie night in the future.
This is exactly what my husband and I were hoping for. A regular thing that he and I host where everyone can just come around and enjoy the outdoors while watching a fun old movie everyone knows the lines to. Of course people are already giving there input on the next film.  I am very much enjoying the enthusiasm.   As it becomes more of a regular thing then we can ask our guest to bring certain items of food so the provisions are not strictly provided by us.
 
I am dying to have a more themed movie to have a specific entre' to dine on and theme to decorate with. Maybe even have movie nights of dressing up!  The ideas are endless. 
 
 
I have wanted to through a Hunger Games screening party with beef stew instead of lamb stew and bread like what Katniss' favorite dish was. Then I can even give the whole set up more of a theme over.
 
  But to be honest, you really don't have to go all out.   People will be happy with drinks, popcorn, and a movie.   So start small, just put on a good movie and your party will definitely be a hit.
 
  Tell me what you think, leave a comment below.
 
 
Have fun and keep on crafting!

Friday, April 12, 2013

Logo Ideas

Help!
Which way should I go? 
I have been struggling with what my website logo should look like.  I have done a few sketches and I need your help figuring out which direction I should go further with.
(I know one is just the Profile design I have already but I have considered it for the logo too.)

Comments below please!
Please remember these are works in progress.
And keep on crafting!

Monday, April 8, 2013

Simple Sewing Needle Guide


And here we go right into it.  Judy Hammond has been gracious enough to give away some more of her sewing secrets.  Here is a list of needle numbers and what they are for...
 
Sewing Needle Number Guide   

 
Light Fabric

7-9

Light to Medium

10-12

Medium

14

Denim

16

Canvas to Heavy

18-20
These numbers coincide with Stretch, Universal, or Upholstery.  Obviously it doesn't have serger needles, double needles or anything too complicated like some of the super thick 20's but it should help us naïve seamstress' like me. 
 
As I learn more I will relay the information back to you. Keep on crafting.
 
 
 Any comments?  Let me know below.


Sewing tip # 1

Alright everyone!  Know I am not a pro seamstress but my mother is and I've recently realized I need to know more just to do some menial craft projects.  I was recently asked at work what I would do to sew sheer fabric.  I was smart enough to know that a special needle was necessary but not did I know which one.  Judy Hammond to the rescue! I contacted my mom via text and she responded with size nine.  The sewing machine needles have different labels on there cases, universal, stretch, and numbers.  Nine is the number for sewing sheer fabric.  I give more answers as I get them. 
Love you all and keep on crafting!

Saturday, April 6, 2013

Outdoor Projector Screen Tutorial

Outdoor Movie Night


   On "Black Friday" my husband and I found an inexpensive family projector at Kohl's really cheap.  I don't even remember how cheap it was because it was almost 6 months ago and we only played with it a little because "winter was coming." (ha-ha for all my Game of Thrones fans)
   Anyways, we didn't have a projector screen just lying around.  The ones I found online were all in the hundreds, much like the projector's themselves cost and any that were not were in  a 40 inch screen size... not really what we wanted.  We wanted something substantial enough to throw a backyard movie drive in party once a month and it be magnificent!  Being the hands on type I am I went to work looking for a tutorial to make my own cheap, portable, and teardown version of what I was finding online. 
  I began scouring the Home Depot and even went to Wal-Mart hoping I would find something that would strike my DIY-in spark into a Ta-dah moment.   In the end I just got a few things that I thought might be a good starting point based on what I had seen online and got to work.  Well, with a lot of trial and error... a lot of trial and error... I finally satisfied my wants for an outdoor movie screen.  I wish I could say I did it all myself and most of it you will be able to do yourself, but the putting together of the pieces I would suggest getting a little help from friends and family.  Well, enough talk, let's get to work


Step One


Materials:
3 yards of any white opaque fabric
(I got vinyl and didn't have to sew down the edges but you could use black-out too)
Sewing machine 
Ruler
Scissors or Rolling blade
Pins
3 PVC Pipes cut down to 8 Ft long  keep the scraps
(whatever width you'd like but I'd suggest 1 1/2 round)
with 2 scrap pipe pieces cut into equal halves leaving four 1 Ft. PVC pieces
2 PVC Elbow joints
2 PVC T-joints
Twine or Sturdy rope
4 to 6 Tent Stakes 
and
a Rubber Mallet
Now it's time to sew.
Take your vinyl and sew down the sides with a seam about 4.5 inches wide.  This should leave enough space to put the pipe through the sides.  You may want to but don't have to sew a seam across the top with another piece of fabric.  I would suggest just buying a little extra vinyl so it matches and I would make the seam more like 5 to 5.5 inches wide so it will get around the elbow joints without struggle.  (something I didn't do but suggest is to leave a large enough gap on each side of the top seam so you don't struggle during the assembly process)
Step Two


After the sewing is done its time to set up all your piping.
This I had a lot of trial and error with the help of my family and dumb moments like from a sitcom of a pipe attaching at one side then popping out of the other and back again I realized I needed two people minimum and a rubber mallet.  This is like putting together a tent and you don't want the white to get dirty that's why I am suggesting Vinyl, easy clean up.
I know I should have taken more pictures but it really can't be simpler to explain and the picture kind of does is all.  The steps of assembly are the most important.
Step Three
  1. Attach a PVC pipe to one Elbow joint.
  2. Next you will want to set up your feet.  These will only partially support your projector so don't leave out the rope and tent stakes.  Take your T-joint and connect your 1 Ft pieces to the two opposite sides leaving the top joint open for the 8 Ft poles.  Make sure to mallet the pipe in or it will slip loose.
  3. With the first PVC pipe you connected to the Elbow joint thread this piece across the longest seam of the fabric.  This will be the top of your projector screen.  Cap the end off with the other Elbow joint but make sure it is in the same angle as your other Elbow because it can be difficult to adjust after you mallet it tightly.
  4. Now connect your feet to the other two pipes.
  5. Lastly, thread the sides of the fabric over the other two pipes leaving the feet on the bottom and the joints to connect these at the top.  This is where it gets tricky and having a friend around to hold an end can really help out.  You may also find that the seams are not far enough apart to connect easily, just push it away if you can mallet them together then pull the fabric over the pipe.  It may be taught be it will be fine.
Last Step
The whole projector should be assembled and hopefully you have maneuvered the feet enough so it can stand up and if nature didn't do as it liked you would probably be done now but we are not.  We found that even in dry, hot Fresno, CA we needed a bit more support than 2 Ft feet so we stuck some plastic rope through the pipe and crossed it over to the other side of the pipe and then tacked it into the ground with tent stakes we found at Dick's Sporting goods.  If this is still not enough support you can also thread more rope from the corner joints in a upside down V to give it more tension from the wind.  Trust me it is all worth it to save a couple of hundred bucks on a proper movie screen and it is definitely better than your white sheets hung up on the side of the garage (although good it doesn't reflect quite as well).

So good luck trying it for yourself and if you have any helpful tips please share below.  Happy crafting everyone!


Please follow my blog on Google or put in your email for e-alerts of my postings.

Wednesday, April 3, 2013

Wait for it.....


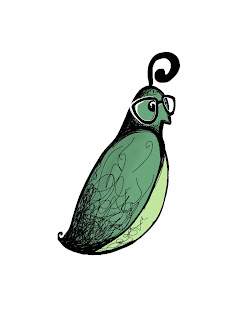
Quail logo idea
  Ok folks! I have failed you already!  So soon you might be thinking.  Well, yes, of course.  I was silly to think that I could make a projector screen over a holiday weekend.   Some of my relatives showed up out of the blue for Easter weekend and although it was great to see them but I was planning to do the screen that day.  Awash were my dreams of testing out and posting my masterpiece that night.  The next day was no different with it being Easter and all.  So, I began feeling discouraged.

  Instead I posted some pictures on Instagram and Facebook of the doodles I was doing for the header for clunkycrafts.com.  Well, unfortunately inspiration never struck and all of the ideas (though mostly well received) fell flat.  So, here's the plan kiddies, a short and simple, "this is what I came up with" tutorial for making an outdoor projector screen by Saturday.  At this point who knows if I shall succeed in this or even start this endeavor but if not the screen than something.  Talk to you later and keep on Crafting!