Wednesday, October 14, 2015

Polymer Clay Charms Update October 2015

Haven't done much, but what I have done, I've done about three times before I have gotten it right. Hah.
So, here you got, the few charms I have done so far. :)
P.S. They are all passable if not terrible photos, sorry.
 
Ken and Ryu from Street Fighter II
 
Boy in Diaper with monkey kid leash on. (I will have to load a back picture later since I don't have it edited.)
 
Basset Hound re-do
 
Character from Naruto named Kurenai
 
Cocker Spaniel
Thanks for following me oh diligent friends. See you next time. :)

Wednesday, October 7, 2015

Polymer Tips and Tricks Lesson #2: How to add findings and connecting chains?

Welcome back to lesson number 2 in the polymer tips and tricks I have learned.
<a href="http://www.amazon.com/gp/product/B00S161YCI/ref=as_li_tl?ie=UTF8&camp=1789&creative=390957&creativeASIN=B00S161YCI&linkCode=as2&tag=cluncraf-20&linkId=LJTM5DST75J5BGYE">CP-nine 100 Pcs Silver Tone Screw Eyes Pin Findings for Clay Jewelry, Resin, Bead, Plastic Size 12 Mm X Hoop 5 Mm</a><img src="http://ir-na.amazon-adsystem.com/e/ir?t=cluncraf-20&l=as2&o=1&a=B00S161YCI" width="1" height="1" border="0" alt="" style="border:none !important; margin:0px !important;" />
Lesson 2.1
Findings
What are findings and why do I need them?

1. Findings:
They are metal connectors, hooks, chains, screws and etc. used to complete your polymer designs.

You may think, well of course I need chain, key rings, etc. if I want to make a completed key chain charm.  There are just a few things to consider before going to your local craft or hardware store. 

2. What kind of findings do you need for your project?
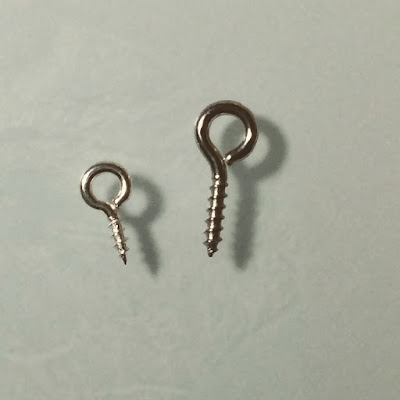
I tend to use small hook eye screws in all of my charms.  It doesn't waste a lot of metal, and it doesn't risk me smooshing my piece trying to get a metal rod to go through it cleanly. 
Do you need chain for necklaces?  Or key chain and key ring for key chain charms?  Do you intend to make your clay into dust plugs, earrings, or beads?  Ask your self these questions to determine what your finished project should look like so you know what metal findings you will need to complete it.
I have only done full clay with eye pins or eye screws as my finished metal attachments so I don't have a lot of advice in this area. 

3. What is the best way to attach a loop/hook to my charm?
  I was using a technique I had seen many others use on You tube videos where you take an eye pin and wire cut it down so it is about 3 mm long.  Then you bend one end so it is shaped like an L then loop the other end into a eye hook.  You would then insert the pin into the charm and then twist  half a turn so it doesn't pull out of the charm while on a key chain.  It didn't work. They all came out over time.  The best way to use  an eye pin is to thread it all the way through the charm making sure it has a stud base then a loop on the other end.  It does work if it is quality metal and the charm will just spin around it and never break away from the finding. 

Otherwise the only thing that works for me are Eye Screws.


 They don't come out and I don't squish my work.  Here is how I attach them.


4. Should I buy the chain and key ring and etc. all separate if I am going to make key chains?
No, not worth it.  I have tried, bulk chains, jump rings, and bead ball chains to make my own key chains.  I do personally use ball chains for some but, I otherwise I have been ripped off with weak jump rings and aluminum jewelry chains.  (like the one I got at Michael's)  Just buy pre-made key rings like Aspire Split Key Rings or the like.  It's worth it to not have my chains break on me.

I know this wasn't a ton of info, but really you just have to try stuff out and find what works for you. 

See you again soon with Lesson #3

Sunday, October 4, 2015

Polymer clay tips and tricks lesson #1: What clay to choose and how to store it?

Hello All,
I have learned a ton over this past year making my little clay figures.  Most of the time I was frustrated with my learning experience.  So many charms broken, lost from their chains or burned.  UGH!  But, learned non-the less.  One of the most exciting things I have learned is how to cook my charms so them become hard as a rock with no risk of breaking.  It took the whole year to figure that out, let me tell you!  We will get to that later but first, let's talk about the kind of clay you should use.

Lesson #1
Picking out the clay
When picking out a good polymer clay, their are a few things you should ask yourself.

1. What is available to you? 
I buy my clay online through auctions and otherwise Michael's craft stores.  The problem with that is the limitation to the types of clays I have to choose from.  I have never seen Cernit, or Kato clays which I have read are harder type clays and Fimo classic only appears to have 3 colors in the classic version.  So, for me it's, Craft brand clay by Michael's, Fimo soft and effects, Sculpey III, Premo, Super Sculpey, and Original Sculpey.

2. What is your internal temperature?
I run hot and I live in a very hot climate so harder clays are preferred.  The best I have run across is Premo Sculpey brand clay which is soft enough when kneaded but not gooey.  (atleast for me)  Other clays aren't bad, because I have noticed that if cooked properly, I mean really perfectly, you won't have to worry too much about breakage and so forth. 

3. Do you like your clay sticky, stiff, or just right?
So, at this point it is about texture and the stability of the clay.  You may probably assume it needs to be just right... not always.  Depending on what you are making you may want more adherance/stickiness, and if you are making something more sculptural then you may want something stiffer than you might usually use.  So, just consider your project before considering the brand of clay. 

4. Last but not least what kind of color options do you need and will they darken during the baking process?
Everything but, black and white have a little or a lot of darkening in my baking process.  I have learned to live with moderate or extreme color differences in exchange for quality and durability.  For example:  My royal blue Premo usually ends up a more navy blue and my very light yellow or sunshine yellow tends to dingy out a little.  Still, it's worth it to not get a call or a text 3 days later with another notification of random dismemberment or the screw detaching from the clay over time.

5.  Is Scupley III as bad as some clayers say it is?
I am back to square one on that one.  I am trying some of the Scupley III I have had stored away again with my new cooking technique but I still have to give it more time on as a key chain to see how it holds up over time.  One observation is it didn't hold it's color through my cooking process but it did get hard as a rock like my Premo does when I have cooked it properly.  I will say it was hard to work with only because it becomes mush in my warm fingers.  I have a feeling it would come in handy smearing it over other materials as a background or base for other projects.  But, if it does hold up it just opens up my purchasing/color spectrum back up again.
**Yes it is as bad as they say.  So is Fimo soft. Even with my full proof cooking method.**

You really need to just try a few clays to find out which works the best for you from start to finish.

 
This is my very old work space but it hasn't changed too much.  Ziploc bags are still my go to but, I will never work with Orignial Sculpey.  It's just good as molding clay not as cooked/ sturdy clay.

Lesson #2
Storage
After you purchase a few or more blocks of clay, what are some of the best ways to store it?

1. How much clay do you have? 
Take into account how much clay you currently have and consider the possible addition to your new collection.  Because Polymer clay does not cure unless cooked it will not go bad so you can purchase in bulk when there is a good sale.  So, whatever your storage solution is consider its possible, if not inevitable, growth.

2. What kind of climate do you live in?
If your house is cold or cool all the time then by all means leave your clay open and exposed and unattended all day.  It will be perfectly fine if not easier to work with if you run hot.
But, if you live in hundred degree weather and your house can easily reach 105 degrees when the AC isn't blazing on then you may need to think a bit harder about storage.  I would say 85 degrees is the hottest your clay's standing temp should get before you risk partially curing your clay.

3. What can you afford?
There are some really fantastic ideas about clay storage.  Some of which would not be cheap.  The best option for me, as much as it does annoy me at times are Ziploc baggies and freezer size Ziplocs.  I am pretty envious of Cindy Lietz's  ("Your polymer clay tutor" ) wall of hardware storage drawers which each store different colors and brands of clay behind her work space.  It's just an arms reach away from any color or clay she needs without any effort and it is so organized.  Jealous? Yes!
Well, anyway, I don't know if the climate in Canada is just cooler or she just keeps the A/C going when it isn't but, her clay seems to hold up just fine.  Now, that probably wasn't cheap mind you, so just make you are in it for the long haul, and/or will just use that type of storage either way.
There are obviously middle of the road type costs too so let's move on.
I had also gotten cassette tape drawers and they were perfect but, my house just gets to hot for me to keep my clay out of refrigeration.

4. What kind of access do you need to your clay?  Are you going to travel from room to room, city to city, or just like to keep things mobile? 
You may be interested in some of the caboodle style carriers/ toolboxes so you can keep all tools and primary clay in one space.  It is great for use in compacting into a tight space when not used and expanding and spreading out in your space when using.  I also love rolling carts and drawers for the same reason, wherever you need to work it can go and everything you need will be all in one place.
The wall of tiny plastic drawers is great if you want a designated space to work and you can do the same with any kind of small bin, jar, slot, whatever on a shelf, peg board or whatever you find.  Polymer clay can be stored in just about anything, just be aware that the polymer can leach out onto fabric and paper and some plastic bins can be eaten away by the polymer clay as well.  I haven't found a site that has specified what type of plastic is compatible and also haven't had any trouble of my own with any plastic bins.  It has been loosely suggested that you get whatever containment you like and test out a piece of clay in it for a week and see if there are any changes to the plastic... then again, I still use Ziploc no matter how many other storage containment I have purchased.  It always seems to come back to Ziploc.  At least you can always use sandwich wrap and Ziploc as a liner or separator from any containment.

3. What are some good storage options if my house is hot?
I didn't want to come home one day to partially cooked unopened polymer clay just because my house got hot.  So, my solution was to refrigerate my clay.  
I have read through many blogs about polymer and found out that a lot of people froze or refrigerated their clay to stiffen it a bit, especially for cutting canes of clay. (Clay Cane : A term borrowed from glassworking referring to glass rods either plain or with a pattern running through them, to be used as an addition to glass pieces. Canes were used to make millefiori beads. )  So, although it wasn't the cheapest or most organized way to store and organize my clay I got a mini-fridge and have been storing my clay there in large freezer sized Ziploc bags ever since.  It has been fantastic!  Ziploc may seem like my favorite storage but it is really the most convenient way to store my clay in a fridge.  I got the mini-fridge so I wouldn't have to leave my craft space just to get my clay, it would also be good for guests (craft room doubles as my guest room) and I would never have to give up space in our kitchen refrigerator for my clay/craft.  I have attempted to create or find some sort of bin/drawer system that will seamlessly move from the mini-fridge to my desk to no avail.  Until we move onto a cooler climate it's Ziploc and a mini-fridge so as not to risk my clay's integrity.

Find the clay you like, research containers, check out other blogs, look at the space available to you, the funds available to you, and how much you'll be needing to store before spending money on storage.  Remember, Ziploc, the plastic they are wrapped in or just sitting out on bare plastic, glass or metal is all this kind of storage this clay really needs.  It will not air dry by any means, so, feel free to leave your project where it lies over night and come back to it when you are ready and as long as it didn't get over 90 degrees and wasn't laying on a piece of fabric or paper it shouldn't have changed at all.

See you again next week for Lesson plan #2 in Polymer clay tips.
.... a few good website all about polymer clay.
http://www.beadsandbeading.com/blog/ : a one woman guide to everything polymer, she makes great videos too.
http://www.glassattic.com/ : hard to read but, the opinions about polymer clay are fruitful.