Wednesday, November 27, 2013

Fresh Cranberry Sauce, Easier than you think!

 
 Ever hated Cranberry Sauce?  I have... always.  Of course others feel differently about cranberry sauce so we have to have it at Thanksgiving.  There just had to be something better than the canned stuff.  Of course we all know that cranberry sauce hasn't always been in a can so let's learn how to make it ourselves.  By the way this sauce can be made days in advanced, getting just part of a whole day of cooking done a little early.
(P.S. the recipe is found on the back of the cranberry bag, I just cut the sugar by a few tablespoons.  Don't bother with a crockpot recipe, it's too easy for that.)


 First get your ingredients.
1 cup of water
1 cup of sugar
One 12 oz bag if cranberries
Med sauce pan
 
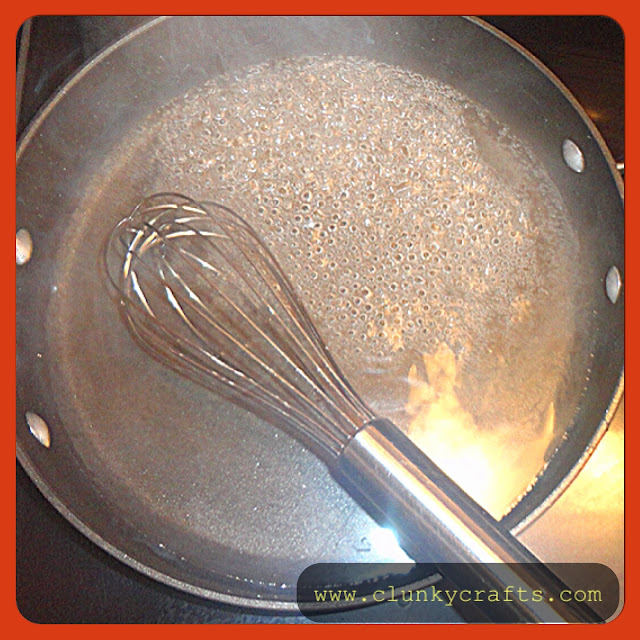
Mix the water and the sugar on med-high heat until the sugar dissolves.
Bring the water to a boil and then add the bag of cranberries.  
Cook on a low boil until the cranberries start to pop.  Not all cranberries will pop so there is no need to cook until they do.  This is were our own personal opinion comes in, you can cook until all of the liquid cooks off or leave a little of the water behind so you have a bit more of a juicy cranberry sauce.
 
Enjoy your fresh cranberry sauce!
 
Thanks for visiting and don't forget to follow me through Pinterest, Google +, or eMail.
Keep on crafting kiddies!

Sunday, November 24, 2013

Doctor Who Costumes and bags

If you didn't already know I am a Doctor Who fan.  I am not British and wasn't raised watching it and it is a little hard for me to watch the classic Doctor Who episodes but the new stuff is flipping awesome.  Knowing this you must be able to appreciate how excited I am about the 50th anniversary movie.  I have already seen it at a viewing party at a friend's house.  We went dressed up as the Tenth Doctor and the Eleventh Doctor.  I needed more after the viewing so, we are of course going to the theater on Monday 25th,2013 for a viewing in 3D.  I wasn't going to the theater in costume but I have to show my fandom so I made a duck tape purse and wallet combo.
Thanks for reading and hope to see you before Thanksgiving, Wednesday night.
Keep on crafting and DIY-in kiddos!

Saturday, November 23, 2013

Fangirl 2013

I am ecstatic people!  I didn't really start to get excited until I watched the amazing Catching Fire.  Amazing doesn't cover it, moving, book worthy, fabulous, and of course "satisfying" (my brother in laws words). After seeing one of my favorite book series treated with such justice my excitement for Doctor Who's 50th anniversary episode amped up a bit.  I am seriously stoked and am just sad I made myself absolutely no swag for it! 😩 
Seriously I am not the only one on pins and needles, just check out Google.

It's not just Doctor Who I'm chomping at the bit for, The Hobbit will be here soon and I love that Lee Pace (Pushing Daisies) will have a major part in it but even more pleased that benedict Cumberbatch is voicing Smaug!
Now if only I didn't have to wait until 2014 for BBC's Sherlock everything would be perfect.
Thanks for hearing my rant. Check in with me Sunday.
Keep on crafting and geek in' out kiddos! 😁

Wednesday, November 20, 2013

Duck Tape Owl Wallet

Ugh!  Going to a smaller purse is hard.  I think the hardest part about it was switching to a smaller wallet!  I went from having practically a mini-purse for a wallet to coin purse for a wallet.  It just wasn't working, my cards were so tight I couldn't stick my fingers in it to get any of them out.  Time to make a new wallet!
The first one didn't go over well.  Can you blame me?  I didn't have a template or pattern so it's learn as you go.  But I think the second one came out much better. I'm still working out the coin situation and it's not closing perfectly yet but the overall look and functionality works. 
Hope you like it too.
 
Thanks for stopping by, sorry I was so late.
See you every Wednesday and Sunday... maybe late but I'll be there. :)


Sunday, November 17, 2013

Progress and new project

Of course I have been hinting at redoing our bathrooms... but, for some reason I haven't wanted to show you anything until I have completely finished so I have a proper before and after.  Once that is done I will talk a little about all of the different things we have done.  But, to give you a little something here are some images of the fixtures in the bathroom now and what we plan on slowly changing them to.
None of the fixtures match and we just got the knobs for the cabinets (which I really like)... unfortunately brass is a hard metal tone to find now.  So, decisions need to be made.  You can also see the fixtures we have are not holding together very well as shown in the bottom left image.
 
My Mother and I found these bronze hooks and decided that putting them on a board and using the hooks to hold the towels would be the best solution.  The choice was made because bronze fixtures are hard to find and we are super cheap so we don't want it if we have to go buy it from a fancy to do home store.
 
Our inspiration was based on the hooks we had in the bathroom first but decided against because they were so far apart it looked odd.  Then it hit us!  Why not buy just a few more hooks and put them all on a board.  It will look much better.  Above is our inspiration.  We already got the board from Michael's and the hooks from Home Depot.  This is going to be awesome!
 
Check in with me later and don't forget to follow me through Google +, Pinterest, or Email.
Ta-Ta for now kiddies.

Wednesday, November 13, 2013

Ribbon Board for Eye Glasses

Really need a place for your multitude of glasses, and sunglasses?  Me too.  At a spur of the moment I grabbed up a loose piece of fabric with, some spare grosgrain ribbon, a stapler, and a small stretched canvas.  (You could use any piece of wood as long as you can stretch fabric over and staple it down.)

Here’s what you do:
 
Get your supplies:
Stapler
Frame or stretched canvas
Fabric cut an inch bigger than your frame
Ribbon
Scissors
Step 1
Cut your fabric at least an inch bigger than the border of your frame.
Step 2
Flip your frame over face down on top of your piece of fabric which should also be face down. 
Step 3
Staple the middle sections of the fabric down the sides of the wood frame.  If you pull taught the fabric should not wrinkle or look uneven.  Once the centers of each side have been stapled down you can continue stapling out from the center out.  Once you get to the corners it gets trickier.  Because it is the back there is no need to be pretty about it.  I fold the fabric into one side then take the rest of the fabric and fold it over to the other side of the corner.  You should have a sort “V” shape or like a flattened cone.  **I am doing a terrible job describing this action… it won’t matter, no one will see it.**
Step 4
I don’t have a image for this but this is where you take the ribbon and place it in any directionality you would like then staple it down the frame on the back tightly.  I just did lines across which I kind of regret and may do differently later because my glasses don’t lay separately.  I even feel like I might prefer this vertical instead of diagonal because of the directionality the glasses must hang. 
Have fun with it!  Hope this gives you some good ideas.  If you wanted more of a multipurpose board you could do this over a cork board or you could create a more cushioned board just by adding some poly-fill, there are all sorts of options.  Anyway, have a great day and I hope to see you all soon.
Don’t forget to follow me on Goggle +, Pinterest, or Email.

Tuesday, November 12, 2013

November book of the month

So if you remember a couple of months back I ran into a treasure trove of wine corks.  It's time to do something else with them but what?  Well, I found this free how to book using wine bottles and corks.  Time to get to work. 
Click the picture above to get the free Kindle download yourself.
Check in with me on Sunday to see what's going on.
And don't forget to follow me through Google.

Sunday, November 10, 2013

Ice Cream Cookies

I really wanted Ice Cream cookies like It's-It ice cream.  I know it seems odd in the middle of fall but I live in Fresno, CA and it is hot all the time.  Anyway, we made them.  Here are the simple steps to make them yourself. 
 
1. Get Ice cream.
2. Get Cookies.
3. Put a scoop of Ice cream onto the inside of one cookie.
4. Squish the two cookies together then put it in baggies in the freezer for about an hour. 
 Ready to enjoy for much cheaper and possibly healthier.  Probably not though!
 
Thanks for coming by and hope to see you next week.

Wednesday, November 6, 2013

Cup Speaker

I am remodeling the bathroom which means I am painting, sanding and so forth.  I just got a new phone and I don't have a speaker system for it, which means I needed to amplify my speaker system somehow.  Of course Pinterest had a way.  You take a large cup, best to be glass, and just stuff your device in speaker down seemed best.  What you get is a slightly amplified sound for no extra cost.  Awesome!
 
See you this weekend and don't forget to follow me on Blogger, Google + or Pinterest.
Keep on crafting kiddies.

Sunday, November 3, 2013

Christmas Gift Exchange idea

Thinking small this year.


There is no way I will be able to buy just one gift this year but I am getting closer.  This year I posed an idea to my family and in-laws, of a gift exchange, or secret Santa if you will.  They were for it. What it means is we will choose a name and only buy a gift for that one person.  I gave all the members participating a plain envelope with a recipe card inside and instruction to write their name on the recipe card and 5 or more gift ideas on the card.  We will then draw an envelope on Thanksgiving day (pick a card, any card) and whoever you pick you get one or more gifts for, not totaling more than $50.  Then of course by Christmas we will exchange gifts and reveal ourselves as the secret Santa.  Maybe in the future it will get a little bigger so more than our immediate family will be in on it and more money will be saved.  Christmas will once again become about Christ and family togetherness and not material things.  I think I'm going to like this tradition. 😍

Thanks for reading and keep on crafting and DIY-ing kiddies.

Saturday, November 2, 2013

Geodesic nightmare dome


Domed Nightmare
Pretty, or is it?
Why is there an AC unit stuck in the wall?
How many angles can you get in one corner?
Why are there two plugs right next to each other at such odd angles?

Just looked at a geodesic dome home today which I thought would be awesome with all sorts of interest to it.  We'll, it was interesting all right!  My realtor had mentioned these words to me about it, "it's sort of reminds me of the Winchester Mystery house".  Those of you who don't live in California might not know but the Winchester Mystery house is a house built by Mrs. Winchester with stairs leading nowhere, doors that open to brick walls and so forth.  Supposedly she was trying to trick or ward off the ghosts killed by her husbands rifles.  So, to say the least the house I was to look at today was going to be quirky. 
I took some pictures and they don't do its strangeness justice, but I will show you anyway.  
Just so you know there were vents on the floors in the middle of the rooms, lights at the strangest angles on the ceilings and walls, and corners where there was no reason for a corner. As if a piece of the wall had just jetted out of the stucco at random.  Hard, very hard to describe. 

Thanks for popping by. See you tomorrow night.